linux


WireGuard

I always used OpenVPN in my servers, but now WireGuard is a better option:

https://www.wireguard.com/

  • It’s simpler
  • It’s more efficient
  • It’s faster
  • It uses modern cryptography algorithms

I’m using it to remotely access private services in my home server. I setup a star topology, where all the VPN clients connect to the home server and they can only see the server.

So I need a dynamic DNS and an open port in the router, I already have them for Home Assistant.

Eloy Coto recommended Tailscale, it is an amazing mesh VPN based in WireGuard. It’s much simpler to set up, and you do not need to open public ports, but it’s commercial and a bit overkill for my needs.

Generating the WireGuard configurations

The most tedious part of WireGuard is to generate the configurations, but there are some nice tools to ease that, like:

https://www.wireguardconfig.com/

The tool generates the configuration for the server and for the requested number of clients. It does everything in the frontend, so it is not leaking the VPN keys.

As I’m only acessing the server, I have removed the IP forwarding options in the Post-Up and Post-Down rules.

Installing and configuring the WireGuard server

WireGuard is in the official Ubuntu repos, so to install it in the server it’s enough to do:

sudo apt install wireguard

Then I needed to put the config in the /etc/wireguard/wg0.conf file and do:

sudo systemctl enable wg-quick@wg0.service
sudo systemctl start wg-quick@wg0.service

Installing and configuring the clients

WireGuard has clients for almost any OS:

https://www.wireguard.com/install/

To setup the client in the phones, the WireGuard Config web tool generates QR codes. In other devices you’ll need to create a file with it or paste the config contents.

Using Pi-hole from the VPN clients

To use the Pi-hole hosted in the same VPN server from the VPN clients, you can specify a DNS property in the client config, i.e. if the server is 100.100.1.1 and the client is 100.100.1.2:

[Interface]
PrivateKey = <client-private-key>
Address = 100.100.1.2/32
DNS = 100.100.1.1

[Peer]
PublicKey = <server-public-key>
PresharedKey = <preshared-key>
Endpoint = <my-home-server>:51820
AllowedIPs = 0.0.0.0/0, ::/0
PersistentKeepalive = 25

Every time that you connect the VPN, the DNS server in the client changes to 100.100.1.1 and it is reverted to the previous DNS server when the VPN is disconnected.

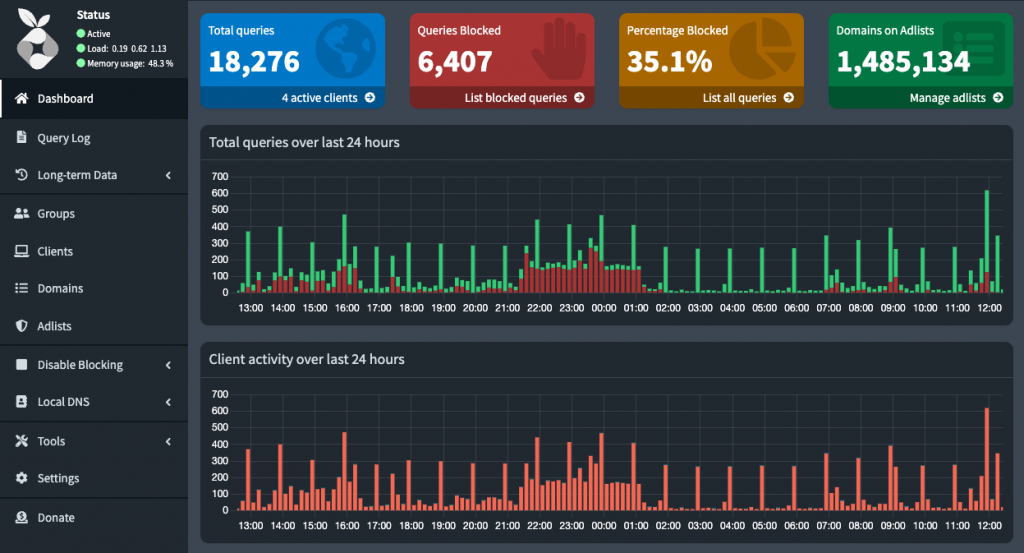
Additionally, Pi-hole needs to be listening in the wg0 interface, I explained how to make Pi-hole listen on multiple interfaces in the Pi-hole post.

Opening Home Assistant to Internet

To make Google Assistant work with your Home Assistant, you need to provide a public URL with HTTPS access to HA. Here are the full instructions:

https://www.home-assistant.io/integrations/google_assistant/

But something that seems trivial, like publicly accessing services in your home server, has some complications, and you usually need to worry about dynamic IPs and security.

What do we need:

  • An ISP not using CG-NAT
  • Redirect ports in the router
  • A dynamic DNS provider and a client to update the IP (or a static IP)
  • An SSL certificate to securely access the HTTP services

ISP providers with CG-NAT

Some ISPs use CG-NAT (Carrier-Grade NAT), sharing the same IPv4 among multiple customers. In that case the only way to expose your services is using reverse proxy services such as ngrok.

Ngrok allows you to generate one static domain and it also automatically generates a SSL certificate, so most steps in this post do not apply.

My ISP (O2 Spain) assigns me a dynamic IP, and I prefer to not rely on these reverse proxy services, so I remotely access my home server redirecting ports in the router.

Dynamic DNS provider

Usually, and unless you have a static IP service (not very common, and not available in my ISP), you need to setup a dynamic DNS service.

I have been using the free Now-DNS service for years:

https://now-dns.com/

And to update the IP in my home server, I setup ddclient with this /etc/ddclient.conf file:

ssl=yes
protocol=dyndns2
daemon=60
mail=root                               # mail all msgs to root
mail-failure=root                       # mail failed update msgs to root
pid=/var/run/ddclient.pid               # record PID in file.
use=web, web=now-dns.com/ip             # get ip from server.
server=now-dns.com                      # default server
login=<your-login>
password=<your-password>
server=now-dns.com,<your-dynamic-domain>

Some of these dynamic DNS domains are blocked in the Pi-hole blocking lists, so, if you are using Pi-hole or other DNS blocking service, you’ll probably need to whitelist your domain.

SSL certificate

With the amazing Certbot you can obtain free SSL certificates:

https://certbot.eff.org/

There is extensive documentation in the Certbot site about how to use it. I simply install certbot from apt and do a:

certbot certonly --webroot -w /var/www/html/ -d <your-dynamic-domain> --email <my-email> --non-interactive --agree-tos

But in order to make that work, you need a domain name (available from the dynamic DNS provider in the previous section).

HTTP Server

And to verify that the domain points to your server, Certbot is going to do an HTTP request to that domain, so you also need to have an HTTP server in the port 80 and open the port 80 in the router. This is also needed for the certificate renewals.

You may encounter numerous attacks on this port, so it is crucial to have a reliable web server that is consistently updated and properly configured. I personally use nginx as my HTTP server, and it has never failed me so far.

Home Assistant

To use the SSL certificate from the HA container, we need to share the folder where certificates are stored passing a “-v /etc/letsencrypt:/etc/letsencrypt” to the docker command and setting in the HA configuration.yaml:

http:
  ssl_certificate: /etc/letsencrypt/live/<your-dynamic-domain>/fullchain.pem
  ssl_key: /etc/letsencrypt/live/<your-dynamic-domain>/privkey.pem

You can also use your public HA URL to remotely access it and to configure in the HA Android application.


Orange Pi 3B

I’ve never been a fan of the Raspberry Pi. In my opinion, it occupies an intermediate position where it is too underpowered for desktop use and too overpowered for IoT projects:

  • To use them as a desktop, there are great X86 alternatives available at about the same price than a RPi 5 but much more powerful, such as the Intel N100.
  • And for IoT projects, the ESP32 is the king, with amazing boards with Wifi, Bluetooth, etc., all at a price of less than 5 euros.

So it’s place may be TV boxes (where I prefer a Chromecast with Android) or small servers where the power consumtion is important because they are always on.

I bought an Orange Pi 3B: 4 cores, 4GB RAM, 64GB eMMC (~50 euros in Aliexpress) to replace my old X86 home server (Intel N450: 2 cores, 2 GB RAM, 64GB SSD):

http://www.orangepi.org/html/hardWare/computerAndMicrocontrollers/details/Orange-Pi-3B.html

The Orange Pi 3B shares the form factor with the Raspberry Pi 3B but it is almost as powerful as the Raspberry Pi 4. Notably, the Orange Pi 3B comes with several advantages over the RPi 4:

  • Support for eMMC (much faster and reliable than SD cards)
  • A power button
  • A full-size HDMI port
  • External antenna
  • And it’s cheaper

I installed the Ubuntu Jammy server image in the eMMC following the OPi manual. It needs to use a USB-A male to USB-A male cable and the RKDevTool (it’s in Chinese) that runs only in Windows.

And, as this machine is going to be exposed to internet, I hardened a bit the security:

  • Changed the APT repositories to ports.ubuntu.com
  • Regenerated SSH server keys
  • Removed SSH root access
  • Changed passwords
  • Renamed the orangepi user
  • Removed the local autologin

To remove the local autologin we need to edit:

  • /lib/systemd/system/getty@.service.d/override.conf: For the display console autologin
  • /lib/systemd/system/serial-getty@.service.d/override.conf: For the serial console autologin
[Service]
ExecStartPre=/bin/sh -c 'exec /bin/sleep 10'
ExecStart=
ExecStart=-/sbin/agetty --noissue --autologin orangepi %I $TERM
Type=idle

Removing the “–autologin orangepi”. If you rename the orangepiuser but you want to keep the autologin, you’ll also need to change the username here.

Then I moved the docker containers and other services from my old X86 server:

  • Home Assistant (docker container)
  • ESPHome dashboard (docker container)
  • Pi-hole (docker container)
  • nginx (for certbot and DNS DoT for Pihole)
  • certbot (to maintain the SSL certificate for Home Assistant)
  • ddclient (dynamic DNS updater)
  • NAS (do not expect anything fancy, I access a USB disk via SSH, it’s enough for Kodi & backups)

Everything seems to work smoothly now.


Pi-hole as home DNS and DHCP server

I encountered numerous issues with my network provider’s router DHCP. Since I haven’t yet decided to acquire another router, I opted to offload the DHCP server to another machine, which is currently running my Home Assistant and NAS.

I was in search of a DHCP server with a web UI. During my exploration, I came across Pi-hole, a DNS server specifically designed to block DNS queries to domains that serve ads and do tracking. Interestingly, Pi-hole also incorporates an integrated DHCP server (dnsmasqd) that can be configured through its admin UI.

https://pi-hole.net/

I presume the integration of the DHCP server aimed to simplify the setup of clients’ DNS servers, yet it proves highly convenient for home networks. And forget about the “Pi” in the name, it can be run in any linux server, not necessarily in a Raspberry Pi.

I’m still an addict to running everything in Docker containers. So I set up the Docker Pi-hole container (https://github.com/pi-hole/docker-pi-hole) using this script localed at /usr/local/pihole/docker.sh:

#!/bin/bash 
cd $(dirname $(readlink -f $0))
docker stop pihole
docker rm pihole
docker pull pihole/pihole:latest
docker run -d \
	--name pihole \
	--privileged \
	--restart=unless-stopped \
	--network=host \
	-e TZ=Europe/Madrid \
        -e FTLCONF_LOCAL_IPV4=192.168.1.2 \
        -e WEB_PORT=8081 \
	-e WEBPASSWORD=admin \
	-e INTERFACE=eth0 \
	-e DNSMASQ_USER=root \
	-v ./etc-pihole:/etc/pihole \
	-v ./etc-dnsmasq.d:/etc/dnsmasq.d \
	--cap-add=NET_ADMIN \
	pihole/pihole:latest
docker image prune --all
  • Every time that you run the script, it updates the container with the last Pi-hole version
  • It didn’t work without setting FTLCONF_LOCAL_IPV4 to the local IP
  • I needed to set up WEB_PORT to not override with the nginx running in that machine (for Certbot)
  • Setting WEBPASSWORD is the easiest way to initially setup an admin password
  • I couldn’t make the DHCP server work with port mappings, it needed a –network=host
  • There is an image prune at the end to save space by removing old docker images

I also had some problems because Ubunt’s systemd-resolved includes a DNS server, and I needed to disable it:

https://askubuntu.com/questions/907246/how-to-disable-systemd-resolved-in-ubuntu

And of course, you need to disable also the DHCP server on the router, it’s a very bad idea to have two DHCP servers working in the same network…

It is now functioning smoothly, and the included ad-blocking feature is a definite plus. Although it doesn’t currently block ads on YouTube and Twitch, its still great.

I’m also using it in my phone with a Wireguard VPN (it maybe a topic for another post). To make it listen in multiple interfaces like in the local and the VPN interfaces, I needed to create a /usr/local/pihole/etc-dnsmasq.d/99-interfaces.conf adding there:

interface=lo
interface=wg0

Another similar alternative worth exploring is AdGuard Home, but I haven’t had the time to test it yet:

https://adguard.com/en/adguard-home/overview.html


Benchmarking Java to native compilers

Java Duke

Java to native compilers have been around for some years, and I was curious about if one of this solutions could improve the performance of my Carballo Chess Engine.

I ran a tournament between binaries of the Carballo development version (1.5) compiled with different solutions to compare the performance. I used cutechess-cli to run a 3000 game tournament with time control 5″ + 0.1″ per move by side and with the Noomen Test Suite as the starting positions.

The compared binaries

  • The Pure Java Version: This is the carballo-1.5.jar ran with the Oracle JDK 1.8.0_73 VM under my 64bit linux (Debian Sid).
  • GCJ: The GNU’s Java compiler, incomplete and unfinished, but it works for Carballo. This binary was compiled with this script.
  • Excelsior Jet: A classic proprietary Java to native converter at http://www.excelsiorjet.com. I used Excelsior Jet 11 32bit for Linux (evaluation) to generate this binary. The 64bit version had worse results.
  • RoboVM: (https://robovm.com) A solution to run Java apps on iOS. Recently it was bought by Xamarin, and after the Microsoft acquisition of Xamarin, RoboVM was discontinued. RoboVM also has the option to compile Java apps to desktop binaries. I built this binary with the last RoboVM free version (1.8). Now RoboVM is forked in BugVM, but I was not able to build the binary with BugVM.
  • C# compiled with Mono: There is a C# version of Carballo converted with the Sharpen tool. I compiled this binary with MonoDevelop 5.10. The converted code is sub-optimal but it is a good solution if you need a native version (or if you need to integrate Java code in a C# project).

Test results

Rank Name                          ELO   Games   Score   Draws
   1 carballo-1.5-gcj               89    1200     62%     28%
   2 carballo-1.5                   37    1200     55%     27%
   3 carballo-1.5-mono              -5    1200     49%     30%
   4 carballo-1.5-jet              -33    1200     45%     28%
   5 carballo-1.5-robovm           -88    1200     38%     27%

Conclusions

The JVM performance is very good, better than almost all the Java to native solutions.

The exception is GCJ, but it’s incomplete and it will not work for all the Java apps.

I expected better results from Excelsior Jet, as some time ago Carballo Jet binaries where available an used for testing.

The C# version is a bit worse but acceptable.


Rakarrak: The Linux Guitar Effects Processor

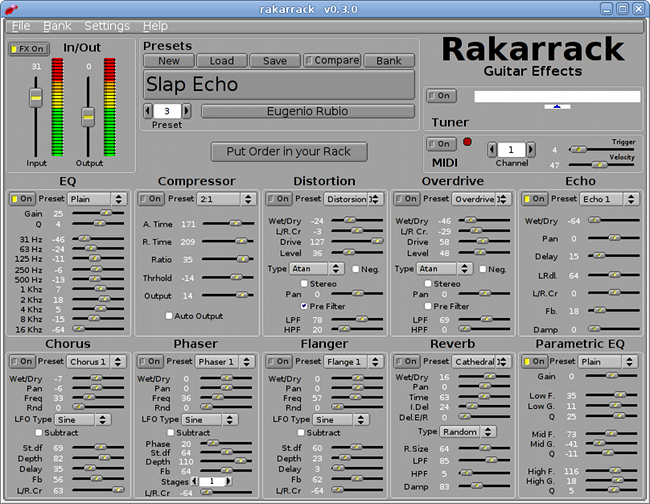
Recently, navigating the Debian repositories I found Rakarrack, an Open Source Linux program to simulate various guitar effects in real time. This sound effects are often done with expensive physical sound processors, but this application makes it all with only one cheap computer (well, I suppose that the quality will rely a lot on the sound card).

Each effect is a module and and has its owns parameters which can be adjusted with sliders from the GUI. Multiple effects can be chained in different configurations.

rakarrack

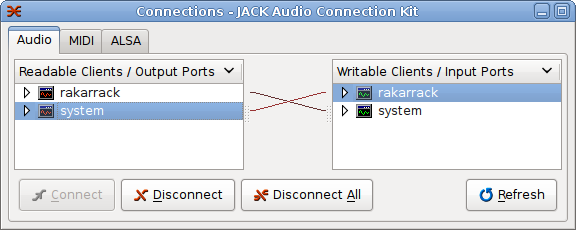
For the audio input and output, It uses the Jack Sound Server. Initially Jacks is a bit complicated to set up but is very versatile. I use the qjackctl to configure and run Jacks simplifying this task. First we start qjackctl and from its GUI, start the jack server. Then run Rakarrack, and with qjackctl we connect Rakarrak to the system sound output and input:

qjackctl_connect

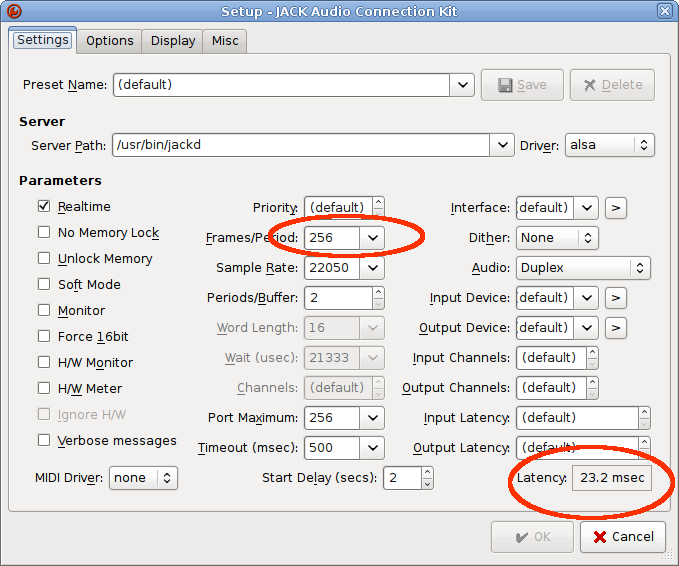
The latency (the sound delay) of Rakarrak is quite good, but depends a lof of the Jack server configuration. This snapshot is the configuration that I am using from qjackctl: the Latency is the important value, and can be minimized adjusting the “frames by period” parameter:

qjackctl

I played a lot using different presets (it has lots of pre-configured) and there are some quite good, but others does not sound as good as a physical pedal, maybe also by le low quality of my notebook sound card.

It also has an integrated guitar tuner, but for this purpose I prefer Lingot from my Friend Iban Cereijo.

A lot of years ago I tested Guitar Rig, a quite pretty (and expensive!) windows applicattion for the same purpose, but then the latency of the sound was too high. Rakkarrak is simpler but enough for most non-professional guitar players, and I like it a lot!

http://rakarrack.sourceforge.net/


Snippet: FLV video encode

snippet

Using mencoder in Linux, we can convert any video to FLV and embed it in a web page with Flowplayer. In this sample video is encoded at 320×240 300 kbps and audio at 56kbps:

# mencoder -forceidx -of lavf -oac mp3lame -lameopts abr:br=56 -srate 22050 -ovc lavc -lavcopts vcodec=flv:vbitrate=300:mbd=2:mv0:trell:v4mv:cbp:last_pred=3 -vf scale=320:240 -o out.flv in.avi


Snippet: Hacer un screencast con Byzanz

snippet

Esta herramienta nos permite generar screencasts (grabaciones de nuestro escritorio) en formato GIF animado (sin sonido, claro). Por ejemplo, para generar un screencast de 60 segundos, y que espere 2 segundos para empezar a grabar:

# byzanz-record -c -d 60 –delay 2 screencast.gif

La -c es para que grabe el movimiento del cursor.

Hay otros programas para grabar screencasts, como Istambul pero éste no me funciona bien en mi Debian Squeeze.


CentOS, alternativa libre a Red Hat Enterprise Linux

Logo de CentOS

En cuanto a las distribuciones de Linux siempre he sido un talibán de Debian, pero hay aplicaciones propietarias que requieren de ciertas distribuciones de Linux para poderse instalar sin problemas, y casi siempre suelen ser compatibles con Red Hat Enterprise Linux (RHEL).

Pues bien, para estos casos tenemos CentOS, que es una distribución de Linux totalmente compatible con RHEL. Sigue las mismas versiones que Red Hat, así una Centos 4.7 es como una RHEL 4.7 y los paquetes son los mismos, idénticos en versiones, y además tenemos actualizaciones gratis de por vida (para Red Hat hay que pagar la subscripción a Red Hat Network). También es muy fácil habiendo instalado un RedHat poner los repositorios de CentOS y convertirlo a un CentOS.

Como es de suponer, CentOS tiene muchos de los defectos de RHEL, como que para actualizar de la versión 4 a la 5 te recomiendan reinstalar desde cero. Yo administré servidores Debian en los que durante muchos años siempre estábamos en la última versión estable sin tener nunca que reinstalar… No obstante se añaden algunas mejoras en unos repositorios separados (CentOS Plus), que permiten por ejemplo tener los PHP 5 en una RHEL 4.x, cuando los repositorios “oficiales” de Red Hat proporcionan sólo PHP 4.

Y por supuesto que, añorando mis Debian, me he instalado el apt para RPM’s, que es una herramienta mucho mejor que el up2date o el yum.