rui


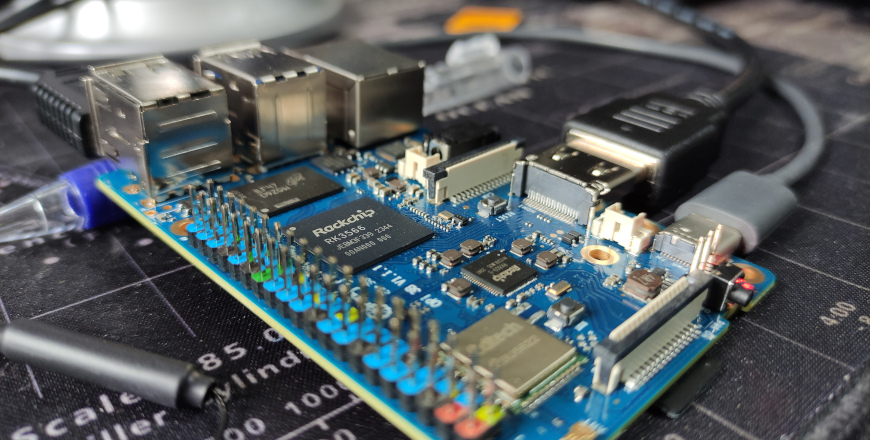
Orange Pi 3B

I’ve never been a fan of the Raspberry Pi. In my opinion, it occupies an intermediate position where it is too underpowered for desktop use and too overpowered for IoT projects:

  • To use them as a desktop, there are great X86 alternatives available at about the same price than a RPi 5 but much more powerful, such as the Intel N100.
  • And for IoT projects, the ESP32 is the king, with amazing boards with Wifi, Bluetooth, etc., all at a price of less than 5 euros.

So it’s place may be TV boxes (where I prefer a Chromecast with Android) or small servers where the power consumtion is important because they are always on.

I bought an Orange Pi 3B: 4 cores, 4GB RAM, 64GB eMMC (~50 euros in Aliexpress) to replace my old X86 home server (Intel N450: 2 cores, 2 GB RAM, 64GB SSD):

http://www.orangepi.org/html/hardWare/computerAndMicrocontrollers/details/Orange-Pi-3B.html

The Orange Pi 3B shares the form factor with the Raspberry Pi 3B but it is almost as powerful as the Raspberry Pi 4. Notably, the Orange Pi 3B comes with several advantages over the RPi 4:

  • Support for eMMC (much faster and reliable than SD cards)
  • A power button
  • A full-size HDMI port
  • External antenna
  • And it’s cheaper

I installed the Ubuntu Jammy server image in the eMMC following the OPi manual. It needs to use a USB-A male to USB-A male cable and the RKDevTool (it’s in Chinese) that runs only in Windows.

And, as this machine is going to be exposed to internet, I hardened a bit the security:

  • Changed the APT repositories to ports.ubuntu.com
  • Regenerated SSH server keys
  • Removed SSH root access
  • Changed passwords
  • Renamed the orangepi user
  • Removed the local autologin

To remove the local autologin we need to edit:

  • /lib/systemd/system/getty@.service.d/override.conf: For the display console autologin
  • /lib/systemd/system/serial-getty@.service.d/override.conf: For the serial console autologin
[Service]
ExecStartPre=/bin/sh -c 'exec /bin/sleep 10'
ExecStart=
ExecStart=-/sbin/agetty --noissue --autologin orangepi %I $TERM
Type=idle

Removing the “–autologin orangepi”. If you rename the orangepiuser but you want to keep the autologin, you’ll also need to change the username here.

Then I moved the docker containers and other services from my old X86 server:

  • Home Assistant (docker container)
  • ESPHome dashboard (docker container)
  • Pi-hole (docker container)
  • nginx (for certbot and DNS DoT for Pihole)
  • certbot (to maintain the SSL certificate for Home Assistant)
  • ddclient (dynamic DNS updater)
  • NAS (do not expect anything fancy, I access a USB disk via SSH, it’s enough for Kodi & backups)

Everything seems to work smoothly now.


Pi-hole as home DNS and DHCP server

I encountered numerous issues with my network provider’s router DHCP. Since I haven’t yet decided to acquire another router, I opted to offload the DHCP server to another machine, which is currently running my Home Assistant and NAS.

I was in search of a DHCP server with a web UI. During my exploration, I came across Pi-hole, a DNS server specifically designed to block DNS queries to domains that serve ads and do tracking. Interestingly, Pi-hole also incorporates an integrated DHCP server (dnsmasqd) that can be configured through its admin UI.

https://pi-hole.net/

I presume the integration of the DHCP server aimed to simplify the setup of clients’ DNS servers, yet it proves highly convenient for home networks. And forget about the “Pi” in the name, it can be run in any linux server, not necessarily in a Raspberry Pi.

I’m still an addict to running everything in Docker containers. So I set up the Docker Pi-hole container (https://github.com/pi-hole/docker-pi-hole) using this script localed at /usr/local/pihole/docker.sh:

#!/bin/bash 
cd $(dirname $(readlink -f $0))
docker stop pihole
docker rm pihole
docker pull pihole/pihole:latest
docker run -d \
	--name pihole \
	--privileged \
	--restart=unless-stopped \
	--network=host \
	-e TZ=Europe/Madrid \
        -e FTLCONF_LOCAL_IPV4=192.168.1.2 \
        -e WEB_PORT=8081 \
	-e WEBPASSWORD=admin \
	-e INTERFACE=eth0 \
	-e DNSMASQ_USER=root \
	-v ./etc-pihole:/etc/pihole \
	-v ./etc-dnsmasq.d:/etc/dnsmasq.d \
	--cap-add=NET_ADMIN \
	pihole/pihole:latest
docker image prune --all
  • Every time that you run the script, it updates the container with the last Pi-hole version
  • It didn’t work without setting FTLCONF_LOCAL_IPV4 to the local IP
  • I needed to set up WEB_PORT to not override with the nginx running in that machine (for Certbot)
  • Setting WEBPASSWORD is the easiest way to initially setup an admin password
  • I couldn’t make the DHCP server work with port mappings, it needed a –network=host
  • There is an image prune at the end to save space by removing old docker images

I also had some problems because Ubunt’s systemd-resolved includes a DNS server, and I needed to disable it:

https://askubuntu.com/questions/907246/how-to-disable-systemd-resolved-in-ubuntu

And of course, you need to disable also the DHCP server on the router, it’s a very bad idea to have two DHCP servers working in the same network…

It is now functioning smoothly, and the included ad-blocking feature is a definite plus. Although it doesn’t currently block ads on YouTube and Twitch, its still great.

I’m also using it in my phone with a Wireguard VPN (it maybe a topic for another post). To make it listen in multiple interfaces like in the local and the VPN interfaces, I needed to create a /usr/local/pihole/etc-dnsmasq.d/99-interfaces.conf adding there:

interface=lo
interface=wg0

Another similar alternative worth exploring is AdGuard Home, but I haven’t had the time to test it yet:

https://adguard.com/en/adguard-home/overview.html


Climate control with ESPHome and Home Assistant

Two years ago I started to need controlling my home heating system while I’m not at home. I could go the easy way and buy a couple Nest thermostats, but I preferred the DIY way.

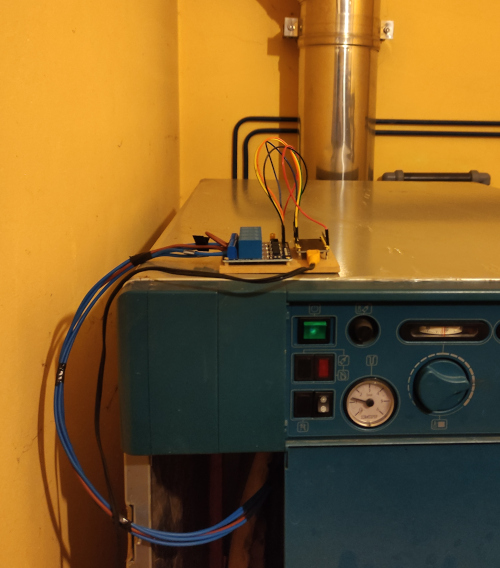
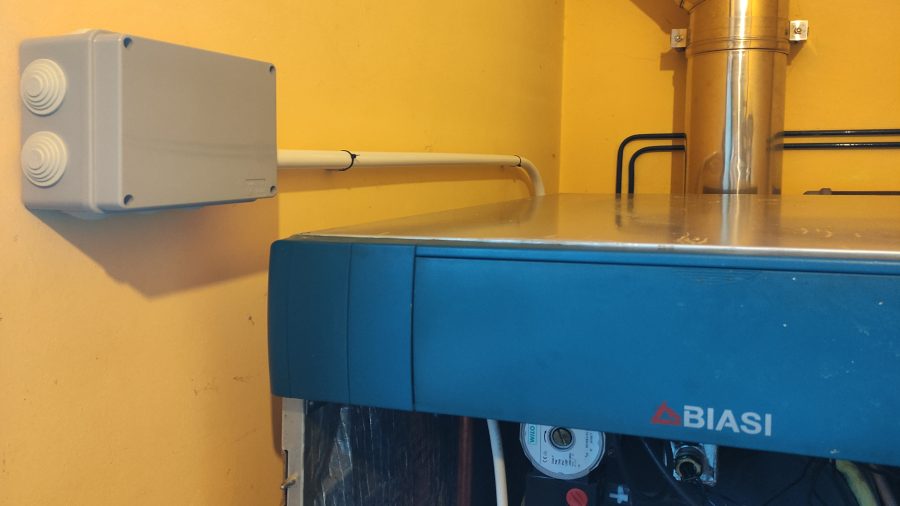
Connecting the boiler to the ESP32 via the relay module

ESP32 board with ESPHome

I connected the boiler to a ESP-WROOM-32 board via a relay module. The box and the cables were more expensive than the board (~10 EUR) and the relay module (~5 EUR).

The ESP32 board is running ESPHome: https://esphome.io/. I think it is a very nice project and very easy to setup. All the configuration is done via YAML files. The board is connected to the home WiFi and it has a fallback hotspot.

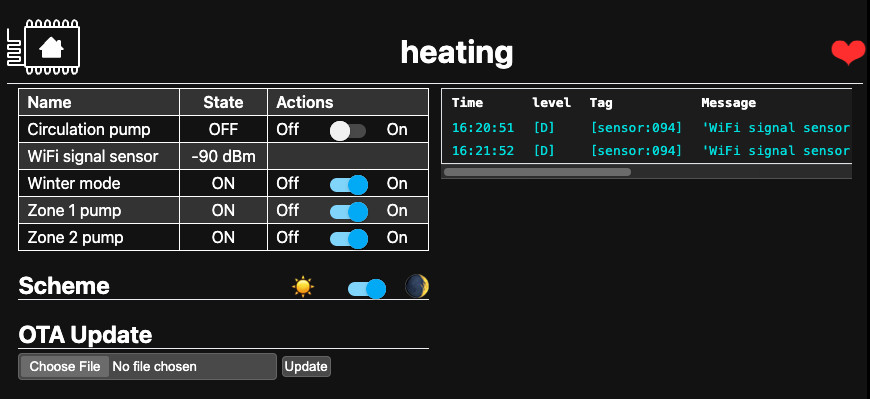
My home heating system has two radiating floor zones with two independent pumps. I also decided to automate the boiler’s “Winter mode”, in this mode the boiler heats the water for the heating, and I wanted to disable it when the heating is not working.

ESPHome has a nice web UI

In my case I needed to activate the winter mode when any pump is working and keep it working for a period of time after the pump is off.

This is my ESPHome YAML config:

substitutions:
  devicename: heating
  friendly_name: Heating

esphome:
  name: ${devicename}
  friendly_name: ${friendly_name}
  platform: ESP32
  board: nodemcu-32s

logger:

api:
  password: ""

ota:
  platform: esphome
  password: ""

wifi:
  ssid: !secret wifi_ssid
  password: !secret wifi_password
  reboot_timeout: 90s

  ap:
    ssid: ${friendly_name} Fallback Hotspot
    password: !secret wifi_password

captive_portal:

web_server:
  port: 80

debug:

time:
  - platform: homeassistant
    id: homeassistant_time

sensor:
  - platform: uptime
    name: Uptime
    filters:
      - lambda: return x / 60.0;
    unit_of_measurement: minutes

  - platform: wifi_signal
    name: Wifi Signal
    update_interval: 60s

script:
  - id: keep_winter_mode_on
    mode: restart
    then:
      - logger.log: "Keep Winter mode start"
      - if:
          condition:
            and:
              - switch.is_off: zone1_pump
              - switch.is_off: zone2_pump
          then:
            - logger.log: "Keep Winter mode will stop"
            - delay: 15min
            - switch.turn_off: winter_mode
            - logger.log: "Keep Winter mode stopped"

  - id: zone1_pump_security
    mode: restart
    then:
      - logger.log: "Zone 1 security start"
      - delay: 60min
      - switch.turn_off: zone1_pump
      - logger.log: "Zone 1 security stop"

  - id: zone2_pump_security
    mode: restart
    then:
      - logger.log: "Zone 2 security start"
      - delay: 60min
      - switch.turn_off: zone2_pump
      - logger.log: "Zone 2 security stop"

switch:
  - platform: gpio
    pin: GPIO16
    name: "Winter mode"
    id: winter_mode
    inverted: true
    restore_mode: ALWAYS_OFF

  - platform: gpio
    pin: GPIO17
    name: "Zone 1 pump"
    id: zone1_pump
    inverted: true
    restore_mode: ALWAYS_OFF
    on_turn_on:
      then:
        - script.stop: keep_winter_mode_on
        - switch.turn_on: winter_mode
        - script.execute: zone1_pump_security
    on_turn_off:
      then:
        - script.stop: zone1_pump_security
        - script.execute: keep_winter_mode_on

  - platform: gpio
    pin: GPIO18
    name: "Zone 2 pump"
    id: zone2_pump
    inverted: true
    restore_mode: ALWAYS_OFF
    on_turn_on:
      then:
        - script.stop: keep_winter_mode_on
        - switch.turn_on: winter_mode
        - script.execute: zone2_pump_security
    on_turn_off:
      then:
        - script.stop: zone2_pump_security
        - script.execute: keep_winter_mode_on

Thermometers

To measure the temperature in the rooms, I used two Xiaomi Mi Home Bluetooth Thermometer 2 (~6 EUR each). They transmit the temperature via BLE (Bluetooth Low Energy) beacons.

Their LCD display is very convenient and, as they are battery powered, you can place them in the better part of the room. I flashed them with this custom firmware:

https://github.com/pvvx/ATC_MiThermometer

I’m still surprised by these small beasts, there are now firmwares to transform them in Zigbee:

https://devbis.github.io/telink-zigbee/.

Home Assistant

The control, reading the thermometers and activating the pumps, is done via a Home Assistant (HA) running in an old X86 tablet with Ubuntu (this is usually run in a Raspberry Pi or similar…).

I installed HA in a Docker container, this is my script to update and start the container:

#!/bin/bash
cd $(dirname $(readlink -f $0))
docker stop homeassistant
docker rm homeassistant
docker pull ghcr.io/home-assistant/home-assistant:stable
docker run -d \
	--name homeassistant \
	--privileged \
	--restart=unless-stopped \
	-e TZ=Europe/Madrid \
	-v ./config:/config \
	-v /etc/letsencrypt:/etc/letsencrypt \
	--network=host \
	ghcr.io/home-assistant/home-assistant:stable
docker image prune --all

Home assistant reads the thermometers via the Passive BLE monitor integration: https://github.com/custom-components/ble_monitor that can be easily installed via HACS (the Home Assistant Community Store). I needed a Bluetooth 5 USB adapter.

Then, I needed to setup two thermostats in HA via the config/configuration.yaml file:

climate:
  - platform: generic_thermostat
    name: "Living Room"
    unique_id: zone_1_thermostat
    heater: switch.zone_1_pump
    target_sensor: sensor.ble_temperature_living_room_thermometer
    min_temp: 15
    max_temp: 20
    ac_mode: false
    target_temp: 17
    cold_tolerance: 0.5
    hot_tolerance: 0
    min_cycle_duration:
      minutes: 30
    keep_alive:
      minutes: 5
    initial_hvac_mode: "off"
    away_temp: 15
    precision: 0.1

  - platform: generic_thermostat
    name: "Bedrooms"
    unique_id: zone_2_thermostat
    heater: switch.zone_2_pump
    target_sensor: sensor.ble_temperature_bedrooms_thermometer
    min_temp: 15
    max_temp: 20
    ac_mode: false
    target_temp: 17
    cold_tolerance: 0.5
    hot_tolerance: 0
    min_cycle_duration:
      minutes: 3
    keep_alive:
      minutes: 5
    initial_hvac_mode: "off"
    away_temp: 15
    precision: 0.1

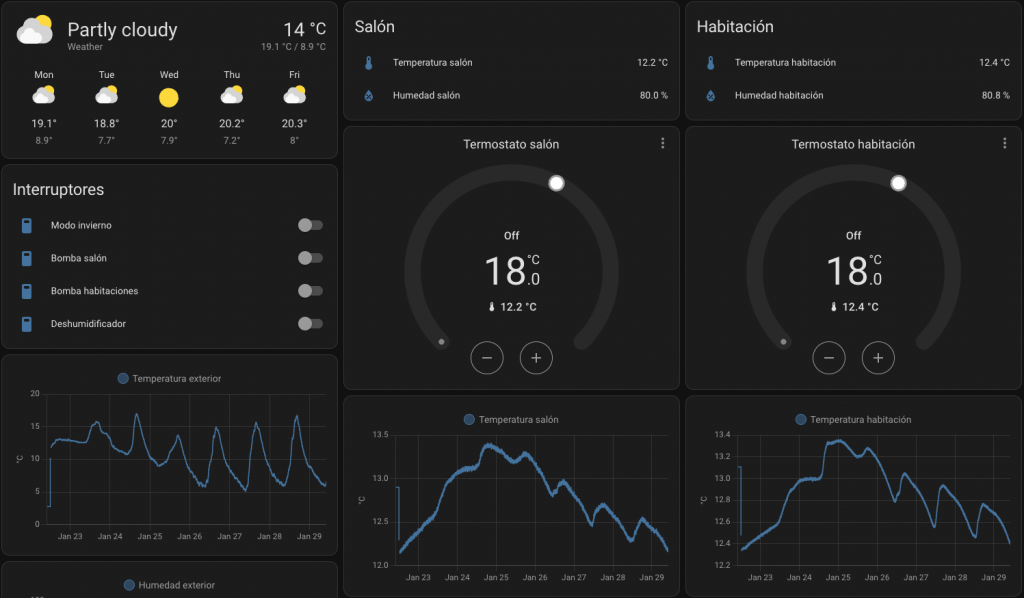
Home Assistant doubles as temperature and humidity logger, and its easy to configure dashboards:

And, of course, now I’m using HA to control many other things at home.

Another complex parts were:

  • Making HA accessible via internet setting up a couple port redirections (one for HA and another for certbot) and a dynamic DNS service
  • Setup nginx and certbot for HTTPS
  • Connecting it to Google Home to allow receiving voice commands from my Nest Minis

But that is another long story…

The final installation if the ESP board, the relay module and the power adapter inside a box

Apple Vision Pro and why it is going to fail

After the initial hype (with Apple showing some nice fake videos…), it seems that now things are much more quiet about the Vision Pro. I’m sure they are going to fail, like all the previous attemps on VR “failed”, or at least they failed as a mass consumer product.

People do not want immersive experiences, or they do not want these experiences all the time. Books like “Neuromancer” or “Ready Player One” portray a society were all the computers use VR interfaces, but I think that is still not possible with the technology we have in 2024. Even if it becomes possible someday, people may not embrace it.

3D interfaces in computers are not comfortable, and all attempts to develop these kinds of interfaces have failed. Humans have been using paper, a “2D” medium, for thousands of years; that is why it’s so easy for us to interact with 2D screens on mobile phones or tablets.

We observed the evolution of past interface design trends, such as skeuomorphism, transforming into clean visual languages characterized by simplified interfaces, as exemplified by material design. The natural environment of these interfaces is 2D.

And additionally, there are other factors like the weight or the low resolution of the screens and the cameras (yes, it’s one of the biggest in the market, but it still cannot replace a real monitor, and it’s going to guarantee you dizziness when you try to read text).

There are still some niches where VR is a success, mainly those gaming related (and of course porn), but Apple is not good at any of those.

I remember some VR/AR memorable failures, the Vision Pro will soon join the list:


Slot Racing 10th anniversary

This year marks the 10th anniversary of my Slot Racing Android game. I had initially begun working on a 2.0 version, but I couldn’t find the time. A few months ago, I decided to merge the changes back into the previous app and prepare the Slot Racing 10th Anniversary edition:

In this version, I’ve removed the no-longer-functional Facebook integration and replaced it with device IDs for the leaderboard. Users can now choose any username for the times they send from their device.

One significant improvement is not immediately visible. I’ve upgraded from an old JMini3d (OpenGL 1.1) to the latest version using OpenGL 2.0. This enables the use of bitmap fonts allowing races with more than 5 laps (the old version only had textures for numbers 1 to 5).

Over the last 10 years, I’ve learned a lot about development. The code looked horrible for today’s standards, so I did a major code refactor. It now supports various race types, adding races against the chronometer.

A minor physics adjustment has been made to prevent users from taking very tight turns at full throttle, which has rendered all previous leaderboard times invalid. Additionally, the leaderboards now differentiate between each lane and the number of laps completed.

During last summer’s holidays, I added new circuits and seasons, including tracks from the current F1 season and Le Mans. Today, I’m applying the final touches to the Bluetooth code and I expect to release it soon.


Avatar and stereoscopic 3D screens

Now that the new Avatar movie was released, it’s time to remember what happened when the first Avatar was released in 2009: It unleashed a craze about stereoscopic 3D movies & TVs.

2010 was declared “The year of 3D TV”. Somehow it was assumed that we were going to watch TV with glasses. I remember “experts” saying ‘In the future all the TVs will be 3D”.

I went to the cinema a couple times to watch 3D movies, and at the begining it was fun to try, but I got bored soon. I also bought a TV without 3D.

There was a lack of 3D content, and some movies where converted to 3D with algorithms producing a mediocre result. Also 3D viewing was causing headaches in a lot of people.

Nintendo joined the trend in 2011 launching the 3DS, that was showing 3D without glasses. But almost everybody was using it with the 3D deactivated, and in 2013 they launched the 2DS, without the 3D.

The production of 3D TVs ended in 2016 putting an end to this trend.

I remember this every time that someone says we are going to use VR headsets for work. Glasses, stereoscopic view, trends, headaches…


OpenAI’s ChatGPT chatbot

OpenAI is a research institute that focuses on conducting research in the field of artificial intelligence. The organization was founded in 2015 with the goal of promoting and developing friendly AI, which refers to AI that is aligned with human values and that can be used to improve the lives of people. OpenAI conducts research in areas such as machine learning, robotics, and economics in order to advance the understanding and capabilities of AI. The organization is supported by a number of high-profile investors and has made significant contributions to the field of AI.

GPT is an acronym that stands for “Generative Pretrained Transformer.” It is a type of large language model that uses deep learning techniques to generate human-like text. It was developed by the research lab OpenAI, and is designed to be able to generate text that is indistinguishable from text written by a human. GPT models are trained on massive amounts of text data, and can generate responses to questions and prompts in a variety of languages and styles. They are often used for a wide range of applications, including language translation, text summarization, and conversation.

As a large language model trained by OpenAI, this chatbot is a type of artificial intelligence that is designed to generate natural language responses based on the input that it receives. It uses machine learning algorithms to process and analyze the input, and then generates a response based on the information that it has been trained on.

This chatbot does not have access to the internet, so it cannot browse or search for information online. Instead, it relies on the knowledge and information that it has been trained on to generate its responses. It is constantly learning and improving, so its responses may become more accurate and relevant over time.

Users can interact with this chatbot by typing in questions or statements, and the chatbot will generate a response in natural language. The specific capabilities and functionality of this chatbot will depend on its design and training.

And now the most interesting part: ALL THE ABOVE TEXT WAS GENERATED BY CHATGPT. It was done by asking it “What is OpenAI?”, “What is GPT?’ and “Tell me how this chatbot works in third person”. Surprised? Me too.

https://chat.openai.com/

Official announcement: https://openai.com/blog/chatgpt/


Fixing an old dehumidifier with Arduino

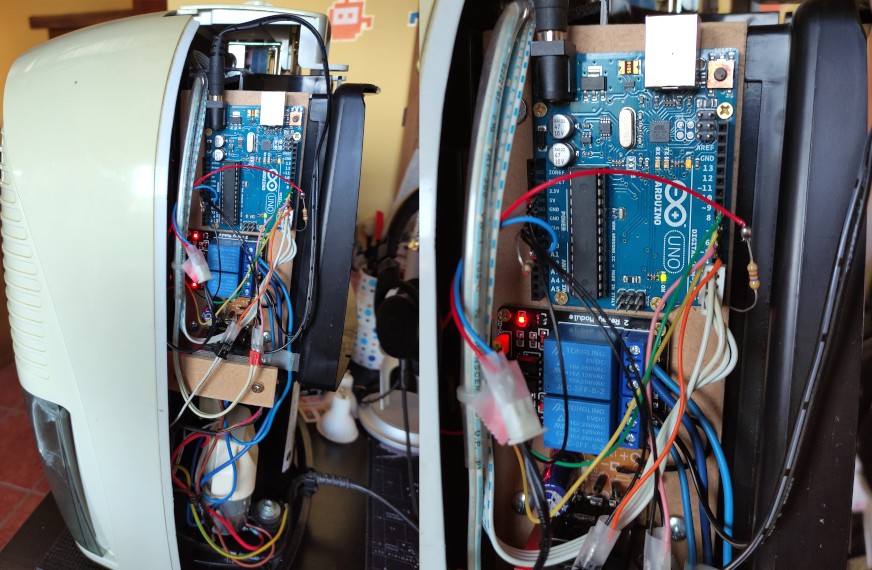
I purchased an Arduino UNO board approximately 10 years ago and conducted various experiments with it. Recently, my old Delonghi DEM 10 dehumidifier ceased to function due to a board issue, and the cost of replacing the original board was approximately 60€. Instead, I opted to replace the faulty board with the Arduino UNO and a two-relay board (designated for the compressor and fan).

BOM:

  • Arduino UNO: 20€
  • Relay board: 5€
  • 12V transformer: found at home
  • ~1€ in cables and screws
  • A resistor
  • Wood recycled from a packaging

And a new dehumidifier with the same specs costs ~150€, but I didn’t do this for the money….

I had a lot of fun coding the program to manage the sensors and the timer. I remembered how thermistors work and implemented the defrost and the overheat protection with a state machine, repurposing the leds to show the states. After stopping the compressor we need to wait ~20 seconds before starting it again (because the capacitor needs to be loaded).

This is the source code, it uses the thermistor library.:

#include "thermistor.h"

const int STATUS_IDLE    = 0;
const int STATUS_WORKING = 1;
const int STATUS_PAUSE   = 2;

const int PIN_FULL        = 6;
const int PIN_HIGRO       = 7;
const int PIN_COMP        = 8;
const int PIN_VENT        = 9;
const int PIN_THERMISTOR  = A0;
const int PIN_LED_ON      = 4;
const int PIN_LED_DEFROST = 3;
const int PIN_LED_PAUSE   = 2;


const long TIME_WAIT               = 50;
const long TIME_BEFORE_PAUSE       = 25 * 60 * 1000L;
const long TIME_PAUSE_TIMER        =  5 * 60 * 1000L;
const long TIME_PAUSE_DEFROST      = 10 * 60 * 1000L;
const long TIME_PAUSE_OVERHEAT     = 10 * 60 * 1000L;
const long TIME_PAUSE_COMP_OFF     = 30 * 1000L;

const int TEMP_DEFROST  =  30; // IN 1/10 ºC
const int TEMP_OVERHEAT = 350; // IN 1/10 ºC

int status = STATUS_PAUSE;

long workingTimer  = TIME_BEFORE_PAUSE;
long pauseTimer = TIME_PAUSE_COMP_OFF;

THERMISTOR thermistor(PIN_THERMISTOR,        
                      10000,          // Nominal resistance at 25 ºC
                      3950,           // thermistor's beta coefficient
                      10000);         // Value of the series resistor

void setup() {
  Serial.begin(9600);
  
  pinMode(PIN_FULL, INPUT_PULLUP);
  pinMode(PIN_HIGRO, INPUT_PULLUP);
  
  pinMode(PIN_COMP, OUTPUT);
  pinMode(PIN_VENT, OUTPUT);
  digitalWrite(PIN_VENT, HIGH);
  digitalWrite(PIN_COMP, HIGH);

  pinMode(PIN_LED_ON, OUTPUT);
  pinMode(PIN_LED_DEFROST, OUTPUT);
  pinMode(PIN_LED_PAUSE, OUTPUT);
  digitalWrite(PIN_LED_ON, HIGH);
  digitalWrite(PIN_LED_DEFROST, HIGH);
  digitalWrite(PIN_LED_PAUSE, HIGH);
}

void loop() {
  long t1 = millis();

  boolean full = digitalRead(PIN_FULL);
  boolean higroOff = digitalRead(PIN_HIGRO);
  uint16_t temp = thermistor.read();

  // Status changes
  switch(status) {
    case STATUS_WORKING: {
      if (full || higroOff) {
        Serial.println("Stopping...");
        status = STATUS_PAUSE;
        pauseTimer = TIME_PAUSE_COMP_OFF;

      } else if (temp < TEMP_DEFROST) {
        Serial.println("Pausing to defrost...");
        status = STATUS_PAUSE;
        pauseTimer = TIME_PAUSE_DEFROST;

      } else if (temp > TEMP_OVERHEAT) {
        Serial.println("Pausing due to overheat ...");
        status = STATUS_PAUSE;
        pauseTimer = TIME_PAUSE_OVERHEAT;

      } else if (workingTimer <= 0) {
        Serial.println("Pausing due to timer...");
        workingTimer = TIME_BEFORE_PAUSE;
        status = STATUS_PAUSE;
        pauseTimer = TIME_PAUSE_TIMER;
      }
      break;
    }

    case STATUS_IDLE: {
      if (!full && !higroOff) {
        Serial.println("Starting...");
        status = STATUS_WORKING;
      }
      break;
    }

    case STATUS_PAUSE: {
      if (pauseTimer <= 0) {
        status = STATUS_IDLE;
      }
      break;
    }
  }

  // New statuses and timer update
  switch(status) {
    case STATUS_WORKING: {
      Serial.println("Working");
      digitalWrite(PIN_VENT, LOW);
      digitalWrite(PIN_COMP, LOW);

      digitalWrite(PIN_LED_ON, LOW);
      digitalWrite(PIN_LED_DEFROST, HIGH);
      digitalWrite(PIN_LED_PAUSE, HIGH);
      break;
    }

    case STATUS_IDLE: {
      Serial.println("Idle");
      digitalWrite(PIN_VENT, HIGH);
      digitalWrite(PIN_COMP, HIGH);

      digitalWrite(PIN_LED_ON, HIGH);
      digitalWrite(PIN_LED_DEFROST, LOW);
      digitalWrite(PIN_LED_PAUSE, HIGH);
      break;
    }

    case STATUS_PAUSE: {
      Serial.println("Paused");
      digitalWrite(PIN_VENT, LOW);
      digitalWrite(PIN_COMP, HIGH);

      digitalWrite(PIN_LED_ON, HIGH);
      digitalWrite(PIN_LED_DEFROST, HIGH);
      digitalWrite(PIN_LED_PAUSE, LOW);
      break;
    }
  }

  // Pause and timer updates
  Serial.print("Temp in 1/10 ºC : ");
  Serial.println(temp);

  delay(TIME_WAIT);
  long t2 = millis();

  switch(status) {
    case STATUS_WORKING: {
      workingTimer -= t2 - t1;
      Serial.println(workingTimer);
      break;
    }

    case STATUS_PAUSE: {
      pauseTimer -= t2 - t1;
      Serial.println(pauseTimer);
      break;
    }
  }
}

And it feels like if I do not suck at electronics anymore 🙂


LaretasGeek AMA

Los compañeros de LaretasGeek (https://twitter.com/laretasgeek) están llevando a cabo una iniciativa de entrevistas en cadena “AMA” (Ask Me Anything) en la que el entrevistado de cada semana escoge a un invitado y lo entrevista la semana siguiente.

En esta cadena de entrevistas, Eloy Coto de Red Hat escogió entrevistarme a mí, y esta fue la entrevista:

https://www.youtube.com/watch?v=aJkifnWjug0

Una semana después, yo escogí entrevistar a Antón Román, CTO de Quobis, y nos quedó otra entrevista muy chula:

https://www.youtube.com/watch?v=jvFiG1ukAWc


The way of St. James by bike

I just finished my third way of St. James by bike, the french way. This was the first time that I am able to finish without too much incidents, so I’m telling my experience.

My ways

In the last years I have done these:

  • Northern way (Camino del norte): It is the prettiest but the most difficult, with lots of slopes. I made Irun-Santiago in 13 days, but I had lots of mechanical problems with my bike and I suffered the rain. It was August and hostels were always full, so I made it from camping to camping.
  • Silver way (Vía de la Plata): I made it in July starting from Seville, it was too hot, and it is very easy to run out of water. I drank 7 liters of water per day. There aren’t fountains in the way and there are very long sections without bars or shops. I fell ill and I had to go back home from Salamanca.
  • French way (Camino francés): It is he easiest but it is crowded. I just made Pamplona-Santiago in 8 days. I made it in June and there was enough room in hostels and the climate was pretty favorable.

I followed always the Eroski guide, but it is in spanish: http://caminodesantiago.consumer.es/. I also used the GPX Viewer android app with tracks downloaded from Wikiloc to help when I get lost.

The bike

You do not need a very strong bike to make the way. You can make it with a road bike, but I prefer to go off-road with a mountain bike and make it following the same path than walking pilgrims.

I use pannier bags and a small backpack where I carry less than 2Kg. Trying to carry all the weight in a backpack can be harmful. You will need additional space for the food and for the water, specially when making the Silver way.

The rear wheel may suffer with the additional weight, so it is better to have a rear tyre in good conditions. I suffered lots of punctures in the Northern way due to a tyre in bad conditions.

And install a bell, it is very important to warn walking pilgrims of your presence and to do not frighten them.

Do not try to go with your bike to the starting point by train, RENFE has serious issues carrying bicycles. It is possible to go by bus, most companies allow you to carry your bike in the trunk paying a small plus.

What to carry

Along the years, I optimized the things to carry, I made this last way carrying only 6.5 Kg:

  • Bike clothing: a t-shirt, a cycling short, glasses, gloves and cycling shoes. I wash the t-shirt and the short every day just after arriving to the hostel.
  • A cotton t-shirt: I use it also as pijama
  • A pair of light trousers
  • 3 x underpants and socks: I also wash my underwear every day
  • Flip flops: for the shower
  • Swimsuit: there are lots of beaches in the northern way and some swimming pools in the others, do not miss them!
  • Rain jacket
  • Sleeping bag: I also use it to sleep in hostels
  • Sleeping pad
  • Tent: I carry a 1 Kg High Peak Minilite, not very resistant to the water https://www.highpeak-outdoor.com/minilite-1038.html
  • Bike tools: I carry a very basic set of tools: a small bike multi-tool, a spare tube, a patch kit and a pair of spare braking pads.
  • A chain lock: I feel safer leaving my bike locked
  • A power bank: I leave it charging in the hostel (it is a minor loss if stolen) and then, during the day, I charge my phone

A pro-trick is to carry your wallet and your electronic devices in a small tupperware. It is an extra protection under the rain.

What to eat

You can find menus for pilgrims by 10 eur. The hostels have kitchen and you can cook there. On the bike, I try to eat the same calories that I am consuming: I carry fruit, sandwiches, cereal bars, cookies, etc. and I stop every hour to eat something.

Where to sleep

Hostels are the best option, I carry a tent as backup, but in my last way it was not necessary. Hostels are cheaper than campings, you can find some hostels by 5 eur/night. Some of the hostels, when they are full, allow you to sleep on the floor (so it’s useful to carry a sleeping pad) or outside, in a tent in the garden.

Most hostels ask you for the Credential, you can get it at many hostels by 2 or 3 eur.

The experience

It’s hard to explain, buy the way is a mix of culture, sport, fellowship and religion (not in my case) that make it a unique experience full of hard to forget moments, and, yes, so good and addictive that I made it three times…

Google Photos album with my French way: https://photos.app.goo.gl/XMJjDm9ZkCDrtbM49